While I planted me seeds for putting in our mini indoor greenhouse Richard did the cutting out of the pieces from the sheet of galvanised lath that we purchased a few weeks back. It took him a while to find a suitable tool this ended up being his all purpose scissors from the garage. He began with cardboard templates of the areas that would require the lath. With the templates made it cut out the shapes needed. After soaking down the wood lath, so the screws would not crack the wood, I helped Richard put up the pieces of lath. He had made washers out of cardboard so the quick-set cement rough coat would stick to them, other types of washers for this sort of work are problematic when it comes to having the rough coat adhere. So here are pictures of the galvanised metal lath attached using the cardboard washers and drywall screws.
Above the door to the main stairs.
Then either side of the door way where there were bigger exposed areas.
The large area on that wall.
We did not cut or put any up over the top of the other doorway down to the basement, that can wait for another day.
Then it was time for the cement mixture to be made. We had 30 minutes to work with a batch so I felt it prudent that we did not mix the whole batch all at once. So we did 1 Kg at a time. I should have had Richard video taping my efforts to apply this mixture into the cracks and the areas where the new lath has been placed. It was a funny in some respects except for when we forgot to place anything on the floor to catch the chunks that fell. We halted my work while the floors were covered and then I got back at it.
The tool I was using was too big for me to work in the small cracks so I ended up using my fingers, I had gloves one, this worked a lot better. Richard suggested that maybe I should try some of the areas where the lath was so we could see how well it worked. It was a lot harder than I imagined but pushed through the lath and the old wood lath very well, the small batch that we made did not go very far so Richard made another batch and I worked this time above the door. As this was a wider area it was a little easier and I was finally getting a system of what worked without loosing too much of the cement onto the floor. I used my fingers to push the new rough stuff against what was still on the walls and also to ensure that the coating was rough not smooth as we will need to add more to the areas I have done. The two lots was enough for me today so next week, all being well, we will continue with the first coat of rough quick setting cement for this first coat.
This is the first area I worked on and found it a lot harder with this narrow area.
These areas were next still a challenge and using my fingers to push the mud in worked a lot better
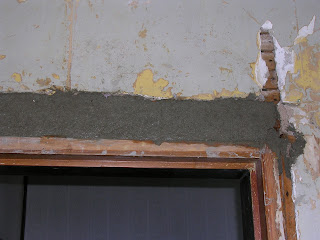
Finally the top of the door
That was all I could tackle today, this rough coat has to be applied first and has to be pushed through the lath to create the keys that hold it to the wall. From the pictures it looks as if I have enough cement in the areas but I don't; I only have enough to go through the lath and just cover it. There is a lot to do yet but I still think I am going the right way about keeping the integrity of my 100 year old home.


No comments:
Post a Comment